on
How to set up a Debian 9 server, firewall with DigitalOcean from a Windows machine and connect to your domain
This is a complete step by step guide on how to set up your server from scratch with DigitalOcean, SFTP, and firewalls, from a Windows machine. I’m writing this from a relative beginner’s perspective so that even if you have no experience you’ll be able to follow along.
- What you’ll need
- Connect to DigitalOcean with SSH
- Server setup with Debian 9, nginx server
- Set up a firewall with ufw
- Connect your domain, set up CloudFlare
- Deploy your site
What you’ll need
So, you’ve built your website, bought a domain, and want to serve it up so people can actually go to it! (Or, you’re thinking of doing any of the above.) In my case, I had my site files, and just wanted to migrate from Bluehost to something I had much more control over - being able to fully access the server environment and install packages as I please.
In order, here are the items I needed in order to make that come true, from a Windows machine.
Big thanks to my friend Tim for helping me out throughout the process!
Services
- DigitalOcean account - my signup link for $100 off your first 2 months
- A domain - get it at your domain registrar of choice - I use NameSilo after trying both GoDaddy and Bluehost, NameSilo is my fave for its no-nonsense
- CloudFlare account
Software
- PuTTY - to generate SSH keys and connect to the server using PuTTY terminal
- Select “Package files” - you’ll want everything like Pageant and PuTTYgen
- WinSCP - What you’ll be using for easy upload/download of files to your server
Useful links
- DigitalOcean docs - how to connect with SSH
- DigitalOcean docs - initial server setup with Debian 9
- DigitalOcean docs - set up a firewall with Debian 9
Good to know
- Basic Linux commands like
cd, rm, cp, mv, touch, nano
Connect to DigitalOcean with SSH
- Use PuTTYgen to generate keys (add password to the key), save them in a folder and remember its location.
- Create Droplet on DO dashboard
- Debian 9
- SSH (NOT one-time password)
- Upload the public key you generated with PuTTYgen to what it requests
- WinSCP - Tool > Pageant on login dialog box
- Add Key - select your private key (usually .ppk) - use the password you set (that it asks for)
- Pageant is running on the task bar icon
- Pageant is so don’t have to set private key for every program that connects to your server
- Use SSH & SFTP into server using WinSCP, set the IP and user:
root- Don’t need to enter anything else, WinSCP will check if Pageant (or equivalent software) is running and uses the private key info they provide
- IP: the DO control panel
- Back to PuTTY
- Session: IP address, connection type: SSH
- SSH-Auth - add private key location (optional: Pageant will do this automatically if running)
- Back to session - put in a name like
myserver, save - OPTIONAL: using Pageant to leave out privatekey/passphrase info in Atom, for example (Remote-FTP package in Atom)
Server setup with Debian 9, nginx server
Fun fact: nginx is pronounced engine-x
- Following DigitalOcean docs - initial server setup with Debian 9
- Step One - Logging in as Root
- Step Two - Creating a New User
- Step Three - Granting Administrative Privileges
-
go to
/root/.ssh - .
mkdir /home/<user>/.ssh
cp authorized_keys /home/<user>/.ssh
chown <user>:<user> -R /home/<user>/.ssh
- .
- This series of steps creates a folder within
’s home directory and log into with the private key created earlier - Note: user
root’s root folder is /root,’s root folder is `/home/ ` - Now should be
@ : (on the command line) TODO: check if this is flipped
- This series of steps creates a folder within
- Good to know commands:
ls,ls -a(shows the files beginning with . that is ignored by justls),<command> --help,man <command>(not installed yet) - Now close the window to exit the session
- Connect again with PuTTY - it will ask for username again
- Instead of
root, put in<user> - Checking if
has `sudo` permissions i.e. is a sudoer (admins) sudo nano /etc/ssh/sshd_config- enter the password- Nano: ctrl+x, y, enter - closes and saves
- Line:
PermitRootLogin, if commented with leading #, uncomment it and make sure it says “no” -PermitRootLogin no- this is for security - when done can’t log in with
rootbut can do everything else withsu,sudo - if someone gets ahold of your debian password and ssh key password, they might get into the server, but don’t have root privileges and can’t
sudo - Also they won’t know what your
is unless it’s saved in PuTTY session etc. (so discourage from saving it there, type it again every time)
- this is for security - when done can’t log in with
Set up a firewall with ufw
- Back to Step Four - Setting Up a Basic Firewall
- Now use
sudoin front of every command - Skip Step Five
- (Optional) Step Six
- By the way…
ufwstands for uncomplicated firewall
- Now use
- Adding CloudFlare
touch update-ufw-cloudflare.sh- creates a file calledupdate-ufw-cloudflare.sh(can be used for creating files in general)- Right click or Shift+Ins can be used to paste
#!/bin/bash

function rule(){
  echo "allow from $1 to any port $2"
}

curl -s https://www.cloudflare.com/ips-v4 > allowed
echo >> allowed
curl -s https://www.cloudflare.com/ips-v6 >> allowed

yes | /usr/sbin/ufw reset

/usr/sbin/ufw default deny incoming
/usr/sbin/ufw default allow outgoing
# /usr/sbin/ufw allow from 127.0.0.1 to 127.0.0.1 port 2095 proto tcp
/usr/sbin/ufw limit ssh
/usr/sbin/ufw limit sftp

while read ip
do
  echo Allowing incoming port 443 from $ip
  /usr/sbin/ufw $(rule $ip 443)
done < allowed
rm allowed

yes | /usr/sbin/ufw enable
Connect your domain, set up CloudFlare
- Sign into CloudFlare - add your domain
- Go to your domain provider - e.g. GoDaddy, NameSilo
- Go to control panel for your domain - DNS settings
- Point them according to CloudFlare’s instructions
- This step might take a while while domain registrar and CloudFlare update your records. Proceed with the next steps in the time being
- Back to DigitalOcean docs
- Make sure you do
sudo systemctl enable nginx(at the end leave it on the enabled state) - Go to DO control panel and enable Floating IP, copy it
- Go to CloudFlare and go to the DNS settings
- A record: floating IP address
- CNAME: www (this enables www.
.com to also go to .com) - CloudFlare - Crypto tab - SSL setting > Full (strict)
- CloudFlare - Crypto tab - create Origin Certificates - default settings - generates private key and CSR (certificate signing request) - save these! (we get Origin Certificate, Private key, instructions at the bottom for Origin CA certificate) - don’t close this page yet!
- Back to PuTTY terminal
cd /etc/nginx
mkdir certs
cd certs
mkdir <your_website>.com
- .
- Folder will look like
etc/nginx/certs/<your_website>.com - Save the CloudFlare certificates as
origin-certificate.pem,origin-certificate.key(or whatever name makes it clear to you what they are) - Back to
certsdirectory wget https://support.cloudflare.com/hc/en-us/article_attachments/201243967/origin-pull-ca.pem
- Folder will look like
- Go to
/etc/nginx/sites-availableand edit the .conf file - remember to substitute your own domain name
server {
  listen 443;
  listen [::]:443;

  server_name <your_website>.com;
  root /var/www/<your_website>.com;

  index index.php index.html index.htm;

  # SSL
  ssl on;
  ssl_certificate /etc/nginx/certs/<your_website>.com/origin-certificate.pem;
  ssl_certificate_key /etc/nginx/certs/<your_website>.com/origin-certificate.key;
  ssl_client_certificate /etc/nginx/certs/origin-pull-ca.pem;
  ssl_verify_client on;

  # CloudFlare
  include /etc/nginx/cloudflare.conf;
- (keep the stuff at the end of the file that you had before)
- What is changed: listen to port 443 instead of 80 (https instead of http)
# SSL and # CloudFlareparts are added (make sure to change the domain to your own)-
Save the .conf file, create new file
/etc/nginx/cloudflare.conf# CloudFlare # https://www.cloudflare.com/ips-v4 # https://www.cloudflare.com/ips-v6 set_real_ip_from 103.21.244.0/22; set_real_ip_from 103.22.200.0/22; set_real_ip_from 103.31.4.0/22; set_real_ip_from 104.16.0.0/12; set_real_ip_from 108.162.192.0/18; set_real_ip_from 131.0.72.0/22; set_real_ip_from 141.101.64.0/18; set_real_ip_from 162.158.0.0/15; set_real_ip_from 172.64.0.0/13; set_real_ip_from 173.245.48.0/20; set_real_ip_from 188.114.96.0/20; set_real_ip_from 190.93.240.0/20; set_real_ip_from 197.234.240.0/22; set_real_ip_from 198.41.128.0/17; set_real_ip_from 2400:cb00::/32; set_real_ip_from 2606:4700::/32; set_real_ip_from 2803:f800::/32; set_real_ip_from 2405:b500::/32; set_real_ip_from 2405:8100::/32; set_real_ip_from 2c0f:f248::/32; set_real_ip_from 2a06:98c0::/29; # use any of the following two real_ip_header CF-Connecting-IP; # real_ip_header X-Forwarded-For;
Deploy your site
sudo nginx -t- if output hassyntax is ok,test is successfulthen continue. If not, common mistakes are: not having the correct url in your files (did you change them all to your domain?) or file name typos in the file paths- If previous step ok,
sudo service nginx reload - CloudFlare Crypto panel - enable Authenticated Origin Pulls (below Always Use HTTPS, which you should also turn on)
sudo apt-get install curl(this might not be default installed, is needed for the .sh)- How to check:
dpkg -s curl | grep Status
- How to check:
chmod +x update-ufw-cloudflare.sh./ update-ufw-cloudflare.sh- Upload your website content to
/var/www/<your_website>.comusing WinSCP - Troubleshooting:
sudo ufw status- check if it’s HTTPSsudo service nginx reload,sudo service nginx restartsudo ufw enable && sudo ufw status numberedshould show the following (after runningupdate-ufw-cloudflare.sh
    To                         Action      From
     --                         ------      ----
[ 1] 22/tcp                     LIMIT IN    Anywhere
[ 2] 115/tcp                    LIMIT IN    Anywhere
[ 3] 443                        ALLOW IN    103.21.244.0/22
[ 4] 443                        ALLOW IN    103.22.200.0/22
[ 5] 443                        ALLOW IN    103.31.4.0/22
[ 6] 443                        ALLOW IN    104.16.0.0/12
[ 7] 443                        ALLOW IN    108.162.192.0/18
[ 8] 443                        ALLOW IN    131.0.72.0/22
[ 9] 443                        ALLOW IN    141.101.64.0/18
[10] 443                        ALLOW IN    162.158.0.0/15
[11] 443                        ALLOW IN    172.64.0.0/13
[12] 443                        ALLOW IN    173.245.48.0/20
[13] 443                        ALLOW IN    188.114.96.0/20
[14] 443                        ALLOW IN    190.93.240.0/20
[15] 443                        ALLOW IN    197.234.240.0/22
[16] 443                        ALLOW IN    198.41.128.0/17
[17] 22/tcp (v6)                LIMIT IN    Anywhere (v6)
[18] 115/tcp (v6)               LIMIT IN    Anywhere (v6)
[19] 443                        ALLOW IN    2400:cb00::/32
[20] 443                        ALLOW IN    2405:8100::/32
[21] 443                        ALLOW IN    2405:b500::/32
[22] 443                        ALLOW IN    2606:4700::/32
[23] 443                        ALLOW IN    2803:f800::/32
[24] 443                        ALLOW IN    2c0f:f248::/32
[25] 443                        ALLOW IN    2a06:98c0::/29
-
Final firewall! Now go to DigitalOcean firewall panel and apply the following rules:
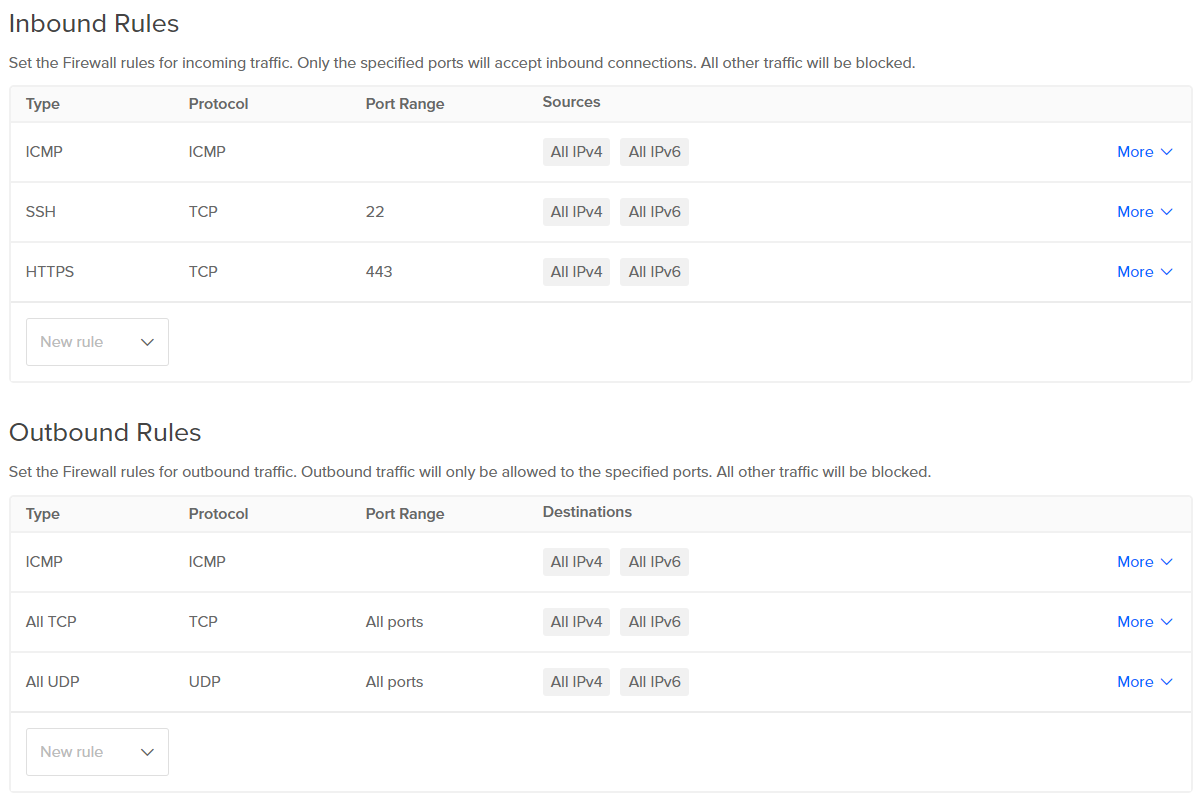
- These settings block everything except those ports on the DO firewall
- ICMP is a ping
- DO firewall - select your droplet and apply it
- (Optional) DO create snapshot of droplet - pretty cheap, can use snapshot to create droplets with this snapshot. Power down the droplet as instructed, then wait for snapshot to be created. Then power up the droplet again when done.
- Final notes: if you change computer you’ll have to copy the SSH keys to your new machine (if you have them saved locally) the ones that we generated with PuTTYgen and connect with Pageant (I’m not too sure about this one, could possibly generate another key pair and connect again?)
Disclaimer: I do not claim to be an expert and any suggestions here do not guarantee anything regarding the security, stability, and other aspects of your web server! :)